Project Management Steps
Contact Client
You should contact the new customer as soon as you receive the project assignment. A phone call to introduce yourself and to let them know you are the project coordinator is a great way to begin.
Sending a follow-up e-mail to your phone call is very effective. It gives the client your contact information and let’s them know you’re on top of the project and ready to move on it. They’ll know that their project will not be delayed because of anything on our end.
Welcome E-mail to Client
Send the client a “Welcome” e-mail to introduce yourself and encourage them to confirm their e-mail address and fill out the questionnaire. It might require a couple of e-mails from you before you finally receive the questionnaire.
Sample Welcome E-mails
Hello, ___________
I am the project coordinator who will oversee the development of your new website(s) for ___________. You should have recently received a welcome e-mail from School Webmasters outlining the development process. Please take a moment to open that welcome e-mail and verify your e-mail address by clicking the link in step #1. Once you have done that, you will receive a development questionnaire. Once I receive your completed questionnaire, I will set up an online meeting with you so we can begin the development process by sharing ideas and identifying your vision for your new website.
In the meantime, please watch this video to learn more about the process for developing your new website.
I look forward to working with you!
Or this….
Hello, ___________
We have received the questionnaire to begin the development process for your new website for _______________. Thank you for completing it.
I wonder if you might have some time early next week to meet with me to discuss your needs and vision for the new site, share ideas visually, and begin planning and gathering information for the site. I am typically available Monday through Friday from 9:00 a.m. to 3:00 p.m. MST, but I am happy to work around your schedule if this window does not work for you.
Please let me know what day and time works best for you, and I will set-up our online meeting. I look forward to working with you!
Thanks so much,
Create Client Folders
Create the client folder in the Google Drive
- From Google Drive: SWM Files > Client Folders > Appropriate folder depending on first letter of name of school district/school.
- Add the main client folder
- Within the main folder, create a folder for each website within the district (e.g. District, ABC Elementary, XYZ High School)
- Within each client folder, add a “Documents” folder and a “Graphics” folder.
- Within the Documents folder, add a folder called Development Files (which will be what everybody will use to store all document files during the development of the website). No need to change sharing properties. Note, if it’s a redesign, label the folder Development Files – Redesign 20xx.
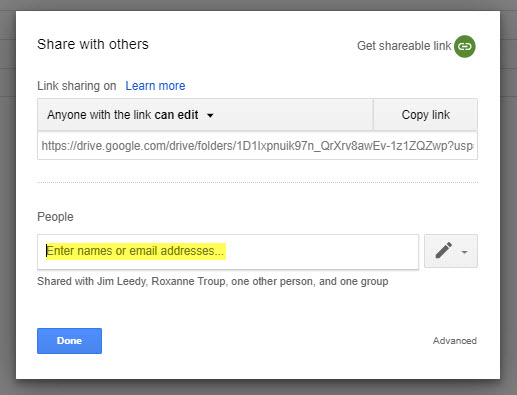
- Within the Documents folder, add another folder called Website Files (which will be used by updaters once the site is developed). Change the sharing settings to add sharing to “anyone with link, can view only.” Click Save. Also add “everyone@schoolwebmasters.com” to the People you want to share it with. (Be sure to un-check the “notify people” box.) Click OK.
- Within the Website Files folder, once you have the approved site map, add a folder for each page of the main navigation e.g. 1. Home/Quicklinks, 2. About Us, etc.
- Within the Documents folder, add another folder called Archived Files. Change the sharing settings to add sharing to “anyone with link, can view only.” Also add “everyone@schoolwebmasters.com” to the People you want to share it with. (Be sure to un-check the “send notifications.”) Click Done.
- Within the Documents folder, add another folder called Old Files. No need to change sharing properties.
- Create “Client Submissions” folder (within the Development folder).
- “Share” with client by adding their email address. (Client must have a Google/Gmail account.)
Video instructions for adding folders and changing sharing settings
Secure the Copywriter
Secure the copywriter, and ask for site map before your planned meeting.
- See PM Project Tracking sheet for CW dates and skill levels
- Put the project name and a question mark (?) in the next line of the person you are asking until you get an answer from her. That way we don’t have two or more PC’s asking them for different projects at the same time.
- Tell her the scope of the project, the deadline for the site map and copy, and the compensation.
- When you have secured the CW, remove the question mark.
- E-mail the completed client questionnaire and any other info you have about the project to CW.
Add Copy Templates to Client Folder
Place copies of appropriate copy writing templates in the client’s Google Drive Documents folder
- Go to Google Drive > .SWM Files > Master Docs > Copywriting Templates > Google Docs.
- Copy the appropriate doc according the project type.
- Rename for project (e.g. copy_clientname_DRAFT).
- Move to client’s Development folder.
- Go to Google Drive > .SWM Files > Master Docs > Copywriting Templates > Spreadsheets.
- Copy the various spreadsheets (Calendar, Contacts, FAQ, Quick Links).
- Rename for project (e.g. contacts_clientname).
- Move to client’s Documents > Development folder.
Client Meeting - Set-up
After receiving the questionnaire, contact the client to set up a project development meeting. We use GoToMeeting for its screen share capabilities.
GoToMeeting.com
e-mail: pm@schoolwebmasters.com
password: schoolweb01
Before you meet with the client, be sure to secure the copywriter and have him/her provide a proposed site map that you can discuss with the client during your first meeting.
Client Meeting
In this meeting, you will cover the following:
- Discuss site map and make revisions as needed.
i. Pay special attention to find out if they will need additional pages other than those the CW has recommended. Be especially on the lookout for things like Daily Announcements page, special programs pages, special forms, individual athletics pages, teacher websites, forms, etc. - ii. If what is needed goes over the contracted page count (not including landing pages), give them a quote (or find out what it will be and get back with them) for the additional pages, and get the “OK” for their development.
iii. It is extremely important to solidify the main navigation in this meeting. Decide on the number of main pages the new site will have in the main navigation, and make sure the client understands that changing this down the line is likely to incur an additional fee. - Use the PM Questions for Development document as an outline; discuss design options and the client’s vision for site.
- Take notes.
- Discuss the time frame to collect data, especially if current website is not up to date.
- Ask client for logo and photo files as well as other needed documents/info (handbooks, staff lists, calendars, program info, etc.)
- Discuss and determine the final URL for the website, and add it to the project Comments notes. (This is especially important when the project involves a district website with additional school websites.) You might make a few suggestions and let them choose what they prefer. For example, the final URL for the Greendale Middle School website in the Lawrenceburg School Corporation (lburg.k12.in.us) might be one of the following:
- greendale.lburg.k12.in.us
- greendalems.lburg.k12.in.us
- middleschool.lburg.k12.in.us
Project Meeting Notes: First make a quick presentation about what makes a good website, using some of our sites as examples, and showing them the main aspects of a good website (simple navigation, quick links, what’s new, site intro and welcome).
Then present the proposed site map, hammer out the details and any questions, and get a verbal approval from the client. Be sure to let them know that it is subject to slight changes, depending on what the copywriter finds as she digs deeper into their existing website and the info they give us (but the main navigation will not change without their permission).
Custom (L3) Websites: Discuss specific design elements (straight or curved lines, background photo or no background photo, large Home header or not, vertical or horizontal quick links section, etc.) Look at various websites—those they sent as sites they like and others from our portfolio. Find out, specifically, what they like and what they don’t like. Take notes.
When you feel like you have a good idea of what they want/like and don’t want/like, you’re done.
9. Send the client a follow-up e-mail thanking them for meeting with you and reminding them of the things they need to send to you.
10. Set up the project plan.
b. Send revised sitemap to CW.
c. Give deadline to CW; update project plan.
d. Have DO purchase domain (if needed).
e. Create sub-domain (if needed).
f. Add current site to Comments.
g. Add client’s desired domain/URL to Comments (including sub/school domains).
h. Add client info to Comments.
ii. Site colors
Info Needed from Client
Some of the typical documents and information we need from the client when we begin a new project include:
- Student/parent handbook
- Staff handbook
- Staff list w/ e-mail addresses
- Staff photos
- Staff bios
- Athletics schedules
- Calendar
- Logo file
- 30–40 school/student photos
Some Good Client Questions
We could never begin to think of all of the specifics we might need to nail down, but here are a few things to think about. It’s important to get specific so you and they know exactly what to expect.
- What do you like about that particular website you showed me?
- What don’t you like about that particular website?
- Would you like the contacts listed by categories (admin, teachers, support staff) or would you prefer straight alphabetical order from top to bottom?
- Would you like to include bios and photos in your staff list? For everybody or just for teachers?
- Is there something, such as a functionality, you really like about your current website that you want to be sure we carry over to the new site?
- Is there information on your current website that you don’t want us to carry over to the new site?
Assigning Team Members to Projects
To be as fair as possible, we assign the copywriter (CW), graphic designer (GD), *user interface member (UI), *content updater (CU), and *graphics updater (GU) in order of the next one “in line” according to the PM Project Tracking Sheet.
*For now, please ask Kristin who she would like you to assign as CU, Kelly who she would like you to assign as GU, and Sarah K who she would like you to assign for UI.
Selecting Team Members
Check to see who is next in line for the job:
- See PM Project Tracking Sheet for team member names and dates of assignments.
- Put the project name and a question mark (?) in the next line of the person you are asking until you get an answer from her. That way we don’t have two or more PC’s asking them for different projects at the same time.
- Tell the CW the scope of the project, the deadline for the site map and copy, and the compensation.
- When you have secured the team member, remove the question mark.
- Add the person’s name to the Smartsheet project schedule, and share the sheet with him/her.
Select the Graphic Designer
If the client has contracted for a custom (L3) or customized template (L2) website, you will need to secure a graphic designer (GD) for the project. The GD will design the website according to the information you gleaned from your first meeting with the client.
If you’re not sure who to ask, ask the art director who she suggests you use for your particular project. Use the PM Tracking Sheet to indicate who you have asked by adding a question mark (?) beside the designer’s name until he/she has accepted the project (so that others know you are asking them) and then removing the question mark once the designer has accepted the project.
Prototype
The GD will create a live prototype and send you the link. Complete the following steps:
- Check it for typos or incorrect information, as well as to be sure it shows the elements the client has specified. Send back to GD for corrections if necessary.
- Wait for approval from the graphics director and the UI director.
- Upon approval from the directors, send the link to the client.
- If the client desires changes to the prototype, send the feedback to the GD, and repeat the process until the client approves it.
- The client must fill out the Prototype Approval Form before we can move forward with the project development.
Redesign Projects
Redesign projects, or the process of creating new websites for existing School Webmasters clients, is a little different than new client projects. This page will help guide you through some of the specifics when it comes to the differences (or things to be more aware of) when coordinating a redesign project.
Staff Lists
Customer support/content will pull the .csv file (if available) from the current website.
- When you meet with the client about the redesign, ask them what information they want listed for admin, staff, and board members (e-mail addresses, phone numbers, extensions, room numbers, etc.).
- Contact content to pull the info, and let them know what info you’ll need from the old website.
End of Project/Last Minute Updates
Check for recent updates to old website to be sure they are carried over to the new site.
When you get to the Final Project Review (PC), one of the steps is “Check with CU to verify that all recent updates made to the original website have also been made to the new one.” Do the following to complete this task:
- Reach out to the CU for the project, and ask them to do any updates that came through the portal starting from the day (or a couple of days before) CU started adding content to the new site. (Please allow them 2 days to get the updates finished.)
- Ask the CU to let you know if any of the requests need a GU so you can reach out to the GU for the project for the completion of those updates. (You may also want to CC Kristin on the e-mail to the CU so she knows what’s going on.) Once that is complete, the site is ready to go live.
If you receive any content changes after this point, please do not put it through the portal. Just e-mail the changes to the CU to take care of.
Using Smartsheet
We have chosen to use Smartsheet (SS) for all of our new and redesign projects. The lead PC will create the project in SS and assign it to you as the PC for the project.
The very first time you are invited to SS, please use your e-mail address as your username. The system will prompt you to choose a password that you will use for all future logins.
Why Smartsheet?
This program allows us to do the following:
- Assign various project tasks to different team members
- Send alerts and reminders
- Save and send attachments within the project plan
- Adjust project dates (hopefully moving the project forward for faster development)
- Track project development
- Create and send various reports
Smartsheet Helps
Please learn how to use the Smartsheet program well in order to move the development of our projects forward as smoothly as possible.
Be a More Effective PC
-
There are always things we can do, habits we can create, that will make us even better at our jobs. Here are a few tips and tricks from the “experts.” Have fun learning and trying new things.
Part 1 — Communication
- Facilitate Effective Communication. Projects and project plans will change. Deadlines will be missed. Scope will increase. Communication must stay consistent.
Emails, meetings, status reports, project plans—these are all just tools for facilitating effective communication. As project managers, we must work to keep those lines of communication open to ensure we have all the details to report back to executives and stakeholders. - Manage Expectations with the Development Team and the Client. The last thing you want to do is surprise your team or the client. Instead, be proactive by warning them beforehand about a situation or challenge that may have occurred.
Let them know the possible consequences, and present your plan of action moving forward to rectify the problem. - Listen First. There are many levels of listening, the most ideal coming from a place of empathy, genuineness, and mindful presence. A great project manager listens to stakeholders, product owners, and teammates free from his or her own personal views.
Take cues from the speaker’s tone and body language, and help the speaker move through what he or she is expressing. - Filter Irrelevant or Trivial Information. A good project manager must be able to identify exactly what the client wants or needs and then filter out all the irrelevant information. Relay only what is necessary to complete the job.
- Set Clear Action Items. Walk away from every meeting with a clear set of action items. Summarize for everyone involved who is responsible for what action item after the meeting.
Set clear expectations for completion of action items and for project tasks and upcoming milestones.. - Communicate More Than You Think Necessary. People need to hear an idea several times before they start to believe it. With so much business communication these days, people constantly filter things out and skim newsletters.
It helps to have the same message in a variety of formats delivered by different people. It’s a massive help to have people in senior positions, like a boss or project sponsor, reinforce your message.
Even though you think you’ve explained everything about the project, the client or the develpment team may not know as much about it as you think they do or should—which is understandable. as they don’t “live” in it the same way that you do.
Make sure your project communication plans include enough time to repeat your message without becoming annoying. - Be Transparent. An exceptional project manager maximizes transparency and doesn’t use information as a means of control. They communicate clearly, completely, and concisely, all the while giving others real information without fear of what they’ll do with it.
- Empower Others to Fix Issues Themselves. Many project managers want to bulldog their way into getting team members to do what they want them to do. If a project manager is not satisfied with something, they might be tempted to directly escalate the issue to management.
Instead, empower the person you’re working with to fix the issue themselves to resolve the problem. - Sort Out Problems Early. A simple but routine project control cycle enables you to sort out problems early—before they get out of hand. It also builds and maintains commitment from within the team and improves communication.
- Learn to be Self Aware and Accepting of Criticism. Greg Smith, project manager at Brailsford & Dunlavey, says he often sees project managers get very set in their ways. They don’t talk about the importance of understanding who you are and where you could improve and working to build different attributes.
Project management can be very result driven, which is good. But if you deliver on the project objectives, much of the time you aren’t given feedback, or you don’t pay attention to constructive criticism. Instead, focus on being self-aware and accepting of criticism.
Part 2 — Humble Leadership
Ask questions. You don’t have to pretend you know everything on day one. Keep it real and allow people to give you suggestions. Don’t be shy about asking questions or following up offline. Speak up.
Don’t isolate your team with over confidence. Don’t think you know everything. Your job is to bring the experts together for everyone’s ultimate benefit.
Build bridges of trust between all involved. Development teams and clients.
Lead with emotional integrity and empathy. Great leaders must be able to identify, control, and express their emotions in a productive manner—and guide their team members toward doing the same.
The best leaders can empathize, or understand and share feelings, with their team members.
We’ve all worked with “silly clients,” and we all get frustrated from time to time. We need a safe and healthy place to be frustrated and express it if we want to. An effective leader listens and empathises while, at the same time, controling their own emotions and allowing their team members to express them productively.
Stay flexible to take on every challenge.
Constantly update your knowledge, trying to develop new capabilities and methodologies.
Delegate wisely and lead by example. Learn what you can delegate. Learn who you can delegate to. Lead by example. Work harder than anyone else. Treat everyone you touch with respect and kindness.
Train your people to be future leaders. It should always be remembered that delegation is not purely about sharing workload. Also, it gives the team member a sense of ownership and liability and allows them to learn… Today’s team member can be tomorrow’s PM.
Think outside the box. The key for successful PM is communication, problem-solving, and decision-making. Working smarter and offering solutions. Thinking outside the box and strategically looking at the bigger picture.
Proactively celebrate success! The most important part: celebrate with your team who made it possible.
- Facilitate Effective Communication. Projects and project plans will change. Deadlines will be missed. Scope will increase. Communication must stay consistent.